Building custom Lineage OS. In this tutorial I’ll walk you through the process of building your own Lineage OS right from source along with setting up the Linux Virtual Machine and Solutions for the common errors that you may face. This may sound lot more complicated than it actually is though. However, to completely understand and execute this you’ll need a lot of patience and time.
First I’m going to start by installing Ubuntu OS on a virtual machine and then work my way around downloading the sources, completing the build and then finally fixing the errors that you may face while building Lineage OS. But its always better to have knowledge about using basic Linux terminal commands and Android operations.
Depending on your computer and internet speed this process could take anywhere from 5 hours to even 5 days. You’ll be downloading more than 15GB of source code Plus your computer hardware will determine the time taken for compiling the code. I have an Intel core i7 6700HQ and around 10 GB of ram associated to the virtual machine with a high-performance SSD and it took around 60-90 mins on the virtual machine, but if you were running Linux natively on your computer rather than on an virtual machine you’ll get much better results.
What you’ll need:-
A Android device with lineage OS support. See all the supported devices here.
A computer running on Linux or OSX (see below for instructions on Ubuntu installation on an virtual machine)
A minimum of 150 GB of disk space
Reliable electricity and a fast internet connection.
Patience!
Part 1:- Setting Up Ubuntu Virtual machine for Building lineage OS.
The video below will show you how to setup the virtual machine with Ubuntu running.
Once the installation is done and you have changed to your nearest server enter the below commands into the terminal to update all the packages.
sudo apt-get update
sudo apt-get upgrade
Download Ubuntu Linux :- https://www.ubuntu.com/download/desktop
Download VMware Workstation Player :- http://bit.ly/1ph2jzC
Part 2:- Downloading the source code and building the Lineage OS .
Whatch it directly on Youtube!
1. Installing the SDK
•Type these commands into the terminal.
wget https://dl.google.com/android/repository/platform-tools-latest-linux.zip
unzip platform-tools-latest-linux.zip -d ~
•Now open the ~/.profile file to edit it using
sudo gedit ~/.profile
•Add the following lines of code at the end of the file and then Save and Exit the file
# add Android SDK platform tools to path
if [ -d “$HOME/platform-tools” ] ; then
PATH=”$HOME/platform-tools:$PATH”
fi
•Now run the command
source ~/.profile
2. Installing Necessary build Packages
•Enter these commands in a single line in your terminal to start downloading and installing all the required packages
sudo apt-get install bc bison build-essential curl flex g++-multilib gcc-multilib git gnupg gperf imagemagick lib32ncurses5-dev lib32readline6-dev lib32z1-dev libesd0-dev liblz4-tool libncurses5-dev libsdl1.2-dev libwxgtk3.0-dev libxml2 libxml2-utils lzop pngcrush schedtool squashfs-tools xsltproc zip zlib1g-dev openjdk-8-jdk
3. Creating the directories
•Type these commands to create three new directories
mkdir -p ~/bin
mkdir -p ~/android/system
4. Installing the repo command
•Type the commands given below to download and grant permission to repo as this tool will be use to download all the source codes.
curl https://storage.googleapis.com/git-repo-downloads/repo > ~/bin/repo
chmod a+x ~/bin/repo
5. Put the ~/bin directory in your path of execution
•In recent versions of Ubuntu, ~/bin should already be in your PATH. You can check this by opening ~/.profile with a text editor using
sudo gedit ~/.profile
•and by verifying that the following code exists if its missing add it if not then skip this step.
# set PATH so it includes user’s private bin if it exists
if [ -d “$HOME/bin” ] ; then
PATH=”$HOME/bin:$PATH”
fi
•if you added the above code then run this command
source ~/.profile
6. Initialize the LineageOS source repository
•Enter the following to initialize the repository
cd ~/android/system
repo init -u https://github.com/LineageOS/android.git -b cm-14.1
git config –global user.email “[email protected]”
git config –global user.name “Your Name”
•Now again run the repo init if it failed at first attempt.
repo init -u https://github.com/LineageOS/android.git -b cm-14.1
7. Download the source code
•Run this command to start the download of source code onto your computer but note that this may take a very long time depending on your computer as you’ll be downloading more than 15 GB of files.
repo sync
8. Prepare the device-specific code
•After the source has been downloaded run the following command to setup the device specific code.
source build/envsetup.sh
breakfast bacon
Note: Breakfast bacon where bacon is the code name for the device OnePlus One and instead of bacon you have to enter the code name of your device. Example for nexus 6P you’ll enter ‘breakfast angler’ here angler is the code name for nexus 6P. If you don’t know the code name for your device then you can check that here.
9. Turn on caching to speed up build process
•Run this command to speed up the nightly builds.
export USE_CCACHE=1
•Now add the above line at the end of your ~/.bashrc file and save and exit the file.
sudo gedit ~/.bashrc
•Now run the below command in the terminal to limit the maximum cache size to your need else this will fill all your disk with its cache.
prebuilts/misc/linux-x86/ccache/ccache -M 75G
Note: 75G at the of the commands corresponds to how many GB of space you want to for cache if you’re just building lineage OS for one device then you can allocate around 25-50 GB if you want to build lineage os for multiple devices then target at least around 75-100GB of cache disk space.
•You can also enable cache compression to save disk space but this will result in a slight bit of performance slowdown it’s totally up to you to enable it or ignore it.
export CCACHE_COMPRESS=1
10. Configure Jack Compiler.
•Jack is a new compiler used from lineage 14 but it always runs out of memory so to fix this run the following command.
export ANDROID_JACK_VM_ARGS=”-Dfile.encoding=UTF-8 -XX:+TieredCompilation -Xmx4G”
•Also add the above line to the end of your ~/.bashrc file to configure it automatically
sudo gedit ~/.bashrc
11. Start the build.
•Now type the below commands to start building Lineage OS for your device
croot
brunch bacon
Note: Brunch bacon where bacon is the code name for the device OnePlus One and instead of bacon you have to enter the code name of your device. Example for nexus 6P you’ll enter ‘brunch angler’ here angler is the code name for nexus 6P. If you don’t know the code name for your device then you can check that here.
*** It will be obvious if the build has succeeded or not. If succeeded, then the lineage OS installer package will be store in “/android/system/out/target/product/” then inside the folder that’s named based on your device. In my case the builds are stored inside “/android/system/out/target/product/bacon/” ***
Part 3:- Fixing the most common errors.
You could face a lot of errors even if you follow the exact procedure so best advice is to be patient and google the issue! I’m sure someone will have the solution to the issue that you’re facing. By saying that here are the solutions to few common issues that you may face.
Whatch it directly on Youtube!
1. Proprietary blobs error.
For most of the devices you’re probably going to run into this problem while running the breakfast command.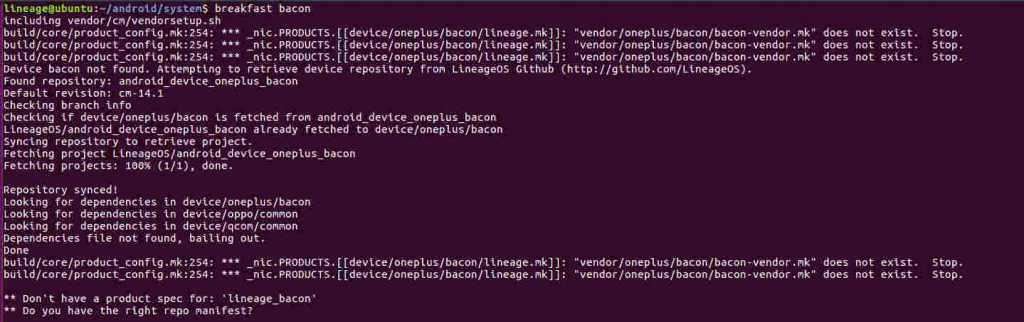
Even if the breakfast command looks like succeeded but when you run the brunch command for your device it will probably show you some error and say that the build failed.
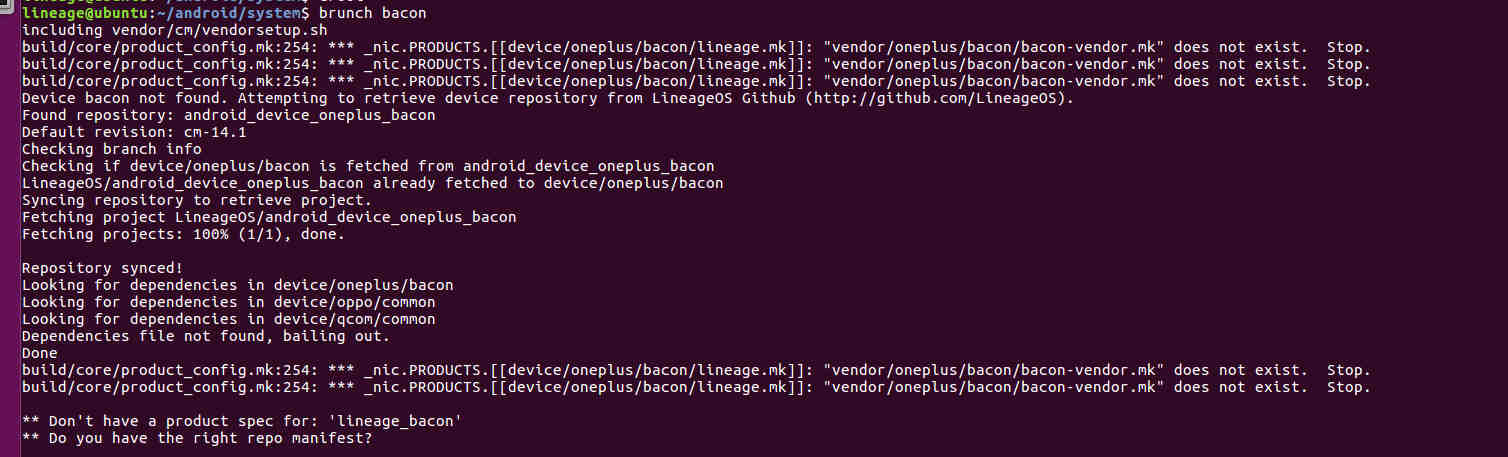
All the above happens because we have to extract and get the propitiatory blobs from the device for which you’ll be building lineage OS, but there are several problems with this like may be building an version for the device you don’t have Etc…
So to overcome this this problem you can get the propitiatory blobs from ‘TheMuppets’ repository in GitHub https://github.com/TheMuppets.
•You can do that by typing the below command in your terminal
sudo gedit .repo/local_manifests/local_manifests.xml
•Now go to this manifests file link and copy the code from here. Then in the text editor that opened up you have to past the copied code from the above link and then save and exit the file. I’ll just be building Lineage OS for OnePlus and Motorola devices so i have deleted all the other lines except the lines where my maufacturer is listed and it looks something like this.
<?xml version=”1.0″ encoding=”UTF-8″?>
<manifest>
<project name=”TheMuppets/proprietary_vendor_motorola” path=”vendor/motorola”/>
<project name=”TheMuppets/proprietary_vendor_oneplus” path=”vendor/oneplus”/>
</manifest>
•Finally run repo sync to sync the changes you’ve made.
repo sync
2.Ninja wrapper error
While building lineage OS if you have followed all the steps until here you shouldn’t get this error but sometimes it just doesn’t work for no reason and may show you something like this.
Before attempting to run the below command to fix the issue and take a look at what it says i wasn’t able to recreate this error and had to fill up my storage device to get this error and it shows there that there is no space left and only then it shows the ninja error so i can just freeup mu sapce and the issue will be solved.
But sometimes it just shows this error with some bizarre errors and possibly the errors you maynot know of then you can run the below command to disable Ninja Wrapper.
•Just type the below command in the terminal and the error will be fixed
export USE_NINJA=false
3.Jack Compiler Java heap size error.
Well we already discussed this above that jack runs out of memory and even though we fixed it above there is a slight bit if chance you may get the error which many look like the these
GC overhead limit exceeded.
Try increasing heap size with java option ‘-Xmx<size>’.
•When you get an error like this you just have to increase the size by entering the below command.
export ANDROID_JACK_VM_ARGS=”-Dfile.encoding=UTF-8 -XX:+TieredCompilation -Xmx4G”
Notice the above command at the end which says -Xmx4G where 4G corresponds to 4GB of space that we allowed it, even after this if you get this error just try increasing this by changing this to ‘-Xmx6G’ or something like that.
•Also remember to change the line at the end of your ~/.bashrc file to configure it automatically
sudo gedit ~/.bashrc
Well these are most common errors that you’ll face while building Lineage OS well if you face any other issues comment down below.
We would love here from you about what you think about this Comment below. If you want to stay updated with our latest updates you can like our Facebook page or keep an eye on our website also follow us on Twitter @hacksandgeeks
Hi
Thank you so much for your effort.
I am getting the following error:
*** Please tell me who you are.
Run
git config –global user.email "[email protected]"
git config –global user.name "Your Name"
to set your account's default identity.
Omit –global to set the identity only in this repository.
fatal: unable to auto-detect email address (got 'me@me-PC.(none)')
I tried running these command to resolve above problem:
git config –global user.email “s****[email protected]”
git config –global user.name “s****37”
repo init -u https://github.com/LineageOS/android.git -b cm-14.1
But still got the same error
yeah could you get me the transcrpit that you got in your terminal aleast around 25-100 lines so i can see the diagonise whats happening.
Copy the content from your terminal and paste it here https://pastebin.com/ and get me the link
https://pastebin.com/aXJ6USch
Waiting for your reply.
Hey I'm really sorry it was a command error in our webpage that was caused by the latest system update i've fixed the commands now.
This is the how the commands should have looked
git config –global user.email "[email protected]"
git config –global user.name "Your Name"
Instead you got this in your browser and hence the error.
git config -global user.email "[email protected]"
git config -global user.name "Your Name"
Thank you so much for all your effort.
i had few questions such as :- If we had already download the rom for certain devices can we modifies according to own desire and while following second part using respo device name it found error it won’t download the further files.
yeah modification of rom is allowed but you’ll need certain knowledge for it and as far as license goes you can find more about that in Lineage OS github repository
could you copy the lines from the terminal window atleast last 100 lines and paste it at https://pastebin.com/ and give us the link
its acts glithcing on the repo sync
I dint exactly get what you meant by glitching.
Here’s what you can do
Press ‘ctrl+c’ this will stop repo sync
Close the terminal and restart Ubuntu
Now open the terminal and change the directory using ‘cd android/system’
Now run the repo sync again
This should work and all should resume from the point where it left off before
I fetched proprietory blob from my android mobile and kept in vendor directory and device tree folder in devices directory .But error still showing to me after typing command brunch o7prolte like as :
** Don’t have a product spec for: ‘lineage_o7prolte’
** Do you have the right repo manifest?
But my devices is not there in TheMuppet github directory .what should i do ?
This has nothing to do with Proprietary blobs as your device isn’t supported by lineage os yet you can check your d vice compatability at wiki.lineageos.org/devices or github.com/LineageOS.
If your device isn’t listed there, it means no developer has developed lineage for your device you can either wait for some developer to build or build it yourself but for that you’ll need a good amount of knowledge on Android kernel sources and a handful of programming languages
Thanks for reply .Just one more question .Is it compulsory to push our android device specific file such as vendor,device tree,kernel,hardware to lineageos github directory and then fetch from that breakfast command command ? .
No it isn’t necessary either you can directly add it to the vendor list by editing the files on your computer or you can fork it from lineage os github.com to your account and then edit the manifests to fetch it from there
Thanks for the videos and effort.
I have a Moto X Style (clark) currently and it’s a supported device. But all the official builds are based on Marshmallow Kernel and Modem. And when flashing on from Stock Nougat, it bootloops.
Though few dev’s have created unofficial builds based on the Nougat Kernel + Modem.
So how can I build the Lineage based on the Nougat Kernel and modem. Source code for kernel is available.
P.S: I have read the comment section on YT, but I can’t find any guides or helpful post on Google or XDA.
P.P.S: I have basic programming language, I make android apps and also ported few ROMs for Mediatek devices back in the day. But never did any major commits for kernel.
Can you help with some links?
it’s a bit difficult to explain but try and go through the manifest files that are created by the repo also see all the folder structures when you get familiar with those you’ll know how the folder structure works and where all the source code fo what goes and effectively change the required files in the directories where your device names are mentioned also mainly you’ll have to edit the manifest files to fetch the source code for your phone from the modded kernel source rather than getting it from lineage os github repo.
Thanks for the reply.
The developer has also provided with the Kernel Tree: https://github.com/HashBang173/android_kernel_motorola_msm8992/commits/cm-14.1_new
One more question, I have a 180GB SSD, which is currently hosting the C drive and Windows 10. But I also have spare 160GB HDD, on which I was planning to do the Lineage Build. Is that enough? and what will be the build time with i3 3.2ghz + 4GB RAM ?
you’ll have to replace that link in the maifest in .repo directory files in there are hidden better use terminal to find the directory name and then edit the file using sudo nano.
Also 160GB should be enough but the are mentions on xda on how to just get the files required to build just one version of lineage os instead of grabbing everything from the repo you could save some space by looking into that.
The build time might be around 2+ hours for then first build and lower from then on but its estimated and depends on lot of things so it might even cross 5 hours if it doesn’t show you that its successful and its not showing you that it failed nor if your computer is frozen that the builds going on just give it some time. I’d recommend you to keep it overnight.
Yep thanks, got it. I might start with Resurrection first, as it also uses the same Lineage kernel tree.
Building it overnight is what the plan is. Am not really committed to building ROMs full time at this moment, So being a bit hesitant on buying another SSD. Thanks though. Will try to make a build in this week. 😀
The best guide ever, especially helpful was the error guide at the bottom, thank you
I have the next error:
https://pastebin.com/Yg2PXxN7
I have tried several times and it results in the same.
Thanks and great guide!
Hello, is it impossible to build if we want to do so with a device having his vendor/kernel/tree but without being supported by lineageos? (Like it has no codename when using breakfast)
Thank you in advance !
you can but you’ll need to edit quite a few files to get it to work
Thank you for your quick answer!
Can you precise which files do i need to edit please?
And if i understood the missing thing in this case is my device-specific code, right?
Hi, I’m having issues trying to get this to work with LineageOS 15.1 on trltexx. Do you know if there’s a way? I’ve seen they’ve just added lineage-15.1 to all the old lines but breackfast just throws do you have the right manifest?
Thanks you in advance
Thats because you device doesnt have CM 15.1 branch in lineage OS github repository yet here have a look
https://github.com/LineageOS/android_device_samsung_trltexx
You must show us how to port lineage os to unofficial device by creating device specific tree and kernel.
Its both a request and a demand.
Bro 10or kernals are Relesed How To Build Custom Rom Using it
Plz build one plus one (bacon) volte ROM
Its a challenge from one plus devlopers
One plus one support volte but they can’t build volte ROM
Best of luck…!
Thanks in advanced
could you do a tutorial on signing build?
that would be great 🙂
can you show how to build android device tree??
i am get this error when Initialize the LineageOS source repository
“fatal: manifest ‘default.xml’ not available
fatal: manifest default.xml not found”
how to fix?
Hello, My device is Onda V10 Pro (4GB Ram and 32GB storage) is not listed in the manifest file of TheMuppets and there is no file such as Proprietary blobs or device tree or kernel,etc present on the github.
But I still want to build custom rom for my device. There is guide available on xda: https://forum.xda-developers.com/chef-central/android/how-to-build-lineageos-14-1-t3551484
Where it says:
Method 1
Now ensure your device is connected to your computer via the USB cable, with ADB and root enabled, and that you are in the ~/android/system/device/your_device/codename folder. Then run the extract-files.sh script:
But I’m getting error directory not found even after my phone detected and adb command is working in ubuntu and my tab is rooted too.
One more thing my device is not supported by LineageOS.
Please I request you to help me. I really need a custom rom.